
How did I get on this kick? And what the heck does it have to do with Trump and our democracy? We are now on a Journey of Stockpiling Truth: Political Prepping 101
Many of you know that I love research and writing stories. My AI assistant suggested I shouuld watch Blast from the Past, so I did. Plus I always remember anniversaries of historical events and watch documentaries about them. It was the 24th anniversary of 9?11, so I have been inundating myself with documentaries about it. All of that got me thinking about it. Then I found recipes from the 50's, 60's, and 70's that are weird, but I remember eating them. Because I click on that video, food podcasts just kept popping up. Can goods that never expire, African meals, meal prep for seniors, the Amish food, Shelf Stable Meal Ideas from Your Prepper Pantry, and Cheap Meals Pioneer Families Ate to Stay Alive. Very intesting choices.
Plus, I was getting depressed focusing on Gaza and starvation. I needed a change. So This should add some fun to our universe. Unfortunately the is a real side to this that is important to consider. Climate cahnge is very real, RFK Jr. is a madman that wants to eliminate vaccines, Trump is sending ICE, The National Guard, and US military into cities, and with the sad assination of Charlie Kirk and the rhetoric against the democrats that is causing, prepping and survival may be necessary. LKet's build the tools to Civic Survivalism: Building the Tools to Outlast Disinformation together!

30 Native American Recipes You Need To Eat In Your Lifetime!30 Native American Recipes You Need To Eat In Your Lifetime!
, 203K subscribers

Disgusting 1950s, 1960s and 1970s recipes

MASSIVE Meal Prep for a Senior! A New Mix & Match Menu to Stock Her Freezer with Easy Meals!

20 Foods The Amish STOCKPILE That NEVER Expire
7 Shelf Stable Meal Ideas from Your Prepper Pantry
169K subscribers

10 Cheap Meals Pioneer Families Ate to Stay Alive


20 Must-Have Foods To STOCKPILE That NEVER EXPIRE!

25 Lost African
ecipes
Check out these videos I’m featuring this week:
And because no pantry is complete without recipes, I’ll be sharing my favorites — from jams and pickles to hearty “log cabin” meals.
🕊️ Just like food keeps our bodies going, truth and community keep democracy strong. Let’s keep our shelves — and our civic spirits — stocked.

Forgotten Farmhouse Recipes You'll Wish You Knew Sooner!

25 CHEAP Recipes during the Great Depression That Can Save You Money Today
Tasting History, Learn to make soup from a stone.

How to Build A 90 Day Food Supply with Just $100
Preppers Guide

Forgotten Garden Traditions: 15 Vintage Features America Left Behind
Plant These 9 Perennial Crops ONCE… and Harvest Forever!


Write your text here...
This is how I survived the war in my country, without a refrigerator
27,428,595 views Premiered Feb 13, 2023 preserving food in jars without a pressure cooker
Recipe for atomic bread from a jar, it stays fresh for up to a year. Bake bread when you have time and when you can, eat when you need it for the next year. Atomic bread is healthy, nutritious and you won't be hungry. The whole family will be full. You can take it with you and eat it when you need it. This bread guarantees survival in difficult times.
Explore the podcastHere's the recipe for Atomic Bread in a Jar from the video:
Ingredients:
Warm water: 300 ml (0:17)
Dry yeast: 1 teaspoon (0:20)
Whole wheat flour: 230 g (0:39)
Ground flaxseed: 60 g (0:45)
Sunflower seeds: 50 g (0:48)
Pumpkin seeds: 50 g (0:50)
Sesame seeds: 50 g (0:53)
Salt: 1 teaspoon (or to taste) (0:59)
Oil: for greasing jars and brushing the top of the bread (2:16, 3:37)
Equipment:
Jars with wide openings (2:02)
Instructions:
Activate Yeast: Dissolve 1 teaspoon of dry yeast in 300 ml of warm water. Stir well and set aside. (0:17-0:35)
Combine Dry Ingredients: In a separate bowl, mix together 230 g of whole wheat flour, 60 g of ground flaxseed, 50 g of sunflower seeds, 50 g of pumpkin seeds, 50 g of sesame seeds, and 1 teaspoon of salt. (0:35-1:03)
Mix Dough: Pour the activated yeast mixture over the dry ingredients and mix everything together until well combined and a uniform mixture is formed. (1:03-1:26)
First Rise: Cover the bowl with foil and let the dough rest in a warm place for 1 hour to activate the yeast. (1:26-1:41)
Prepare Jars: While the dough is rising, prepare your jars. Use jars with wide openings. Remove any rubber seals. Grease the inside of each jar (bottom and sides) thoroughly with oil. (2:02-2:28)
Fill Jars: After the first rise, briefly knead the dough. Fill each greased jar halfway with the dough. Press the dough down firmly to remove any air pockets. (1:41-3:02)
Second Rise: Wipe any dough from the rims of the jars to ensure a good seal later. Let the filled jars stand for 20 minutes. During this time, preheat your oven to 200°C (3:02-3:27).
Bake: Lightly brush the tops of the loaves in the jars with oil. Place the jars on a cold oven rack and transfer them to the preheated oven. Bake for 45 minutes. (3:31-3:57)
Seal Jars: Carefully remove the hot jars from the oven using protective gloves. Submerge the rubber seals for the jar lids in hot water to disinfect them. Place the hot rubber seals onto the jar lids. Use a cloth to help handle the hot jars. (4:01-4:20)
Cool and Store: Immediately seal the hot jars with their lids. Turn the sealed jars upside down and cover them with a cloth. Let them cool completely. Once cooled, store them in a dark, cool place. The bread can last up to a year. (4:30-4:58)
Serve: To remove the bread, open a jar. The bread should slide out easily. (5:01-5:31)


Since I have a ton of these in my yeard, this was awesome
How to gather and clean THOUSANDS of black walnuts, fast and easy
g, Oct 17, 2024 3 products
Feral Foraging earns commission on tagged products. Learn more479K

Now I need a cow and a churn for the EMP!
Nov 28, 2022
Hello There Friends, Learn how to make Butter in less than 10 Minutes! This technique is so simple a CHILD COULD DO IT! You only need one ingredient and one tool. I use a stand mixer, but you could also use a Food Processor. Either way it is super fast and super easy to make Butter! You should all try it at least once just to see how delicious it is! Let me know what you think in the comments below! RECIPE LINK: CREAM! Fatter the Better 2 cups /473 ml of heavy cream will produce approximately 1/2 pound of delicious butter! 1 lbs/ 453 g butter will make 11.5 ounces /333 ml of liquid clarified butter About salt, you can add it at any time and how much really depends on your taste! If you add the salt before the wash some of it will wash off but most of it will stay in. Add a little at first and you can always add more! Good luck and Bon Appetit!!! 😊 ------------------------------------------------ PRODUCTS USED BY CHEF: ❤️ Silicone Spatulas Set of 3: https://chefjp-com.3dcartstores.com/S... ❤️ Laser Thermometer: https://chefjp-com.3dcartstores.com/I... ❤️ Scrapper / Chopper: https://chefjp-com.3dcartstores.com/S... ❤️ Signed copy Chef Jean-Pierre's Cookbook: https://chefjp-com.3dcartstores.com/C... STORE: https://chefjp-com.3dcartstores.com/ 0:00 Intro 0:21 What do you need to make Butter? 0:56 Start Mixing 3:05 Whipped Cream 3:32 Over Whipped Whipped Cream 3:46 Start Separating 5:00 WE GOT BUTTER! 5:58 Rinsing the Butter 8:14 Final Form of Butter! 9:55 Tasting / Outro
Write your text here...


Eating ACORNS 🌰: How to Forage, Store, & Cook Acorns
, 60.1K subscribers, Jun 16, 2021
Acorns are a super sustainable source of sustenance that you can forage from the forest to your front yard! In this video, Wren discusses the different types of acorns, how to identify a good nut, foraging tips, processing acorn meat, and how to use your acorns to make DELICIOUS food. Let us know if you have any acorn recipes below!
Making Pemmican - The Ultimate Survival Food
, Mar 15, 2020
Welcome back. Today we are making the Ultimate survival food - Pemmican. This is a great food to know how to make as it is very calorie dense, light weight, packed with protein, has a long shelf life outside of refrigeration, and gives lots of energy. If you don't want to make it but would like some Pemmican: https://amzn.to/3rIJma8
256K subscribersHere's a written recipe for Pemmican based on the video:
Pemmican is a calorie-dense, lightweight, and long-lasting survival food that is packed with protein and fat (0:13). The recipe in this video focuses on creating a palatable version that addresses common complaints about Pemmican being dry and tasteless (8:26).
Yields: 5 lbs (8:07) Prep time: Approximately 18 hours, mostly unsupervised overnight dehydration (8:07-8:12)
Ingredients:
Meat Powder: Lean beef, such as top or bottom round (3:20-3:27).
Beef Tallow: Rendered from hard beef fat (1:41-1:49).
Optional Dried Fruit Powder: Blueberries, bananas, cranberries, apricots (1:21-1:25).
Optional Salt: 1.5% by weight of the combined meat and fruit powder (6:28-6:32).
Equipment:
Crockpot (2:14)
Strainer (2:36)
Cheesecloth (2:42)
Mold for tallow (e.g., lined with cling film) (2:56-3:00)
Smoker, dehydrator, or oven (3:50-3:55)
Vitamix blender (or mortar and pestle) (4:56-4:58, 5:49-5:51)
Double boiler (7:06)
Vacuum seal bags (optional, for storage) (8:03)
Instructions:
Make Beef Tallow (1:49-3:15):
Obtain hard beef fat from your butcher (1:58-2:00).
Cut the fat into small pieces. You can use a food processor or run it through a grinder with a kidney plate (2:02-2:11).
Place the cut fat into a crockpot with a little water (2:14-2:18).
Cook on low for a couple of hours until the fat is rendered (2:18-2:26).
Strain the rendered fat through a regular strainer to remove larger particles (2:30-2:36).
Strain again through a cheesecloth for a cleaner liquid (2:41-2:44).
Pour the clean tallow into a mold (lined with cling film for easy removal) and refrigerate until hardened (2:53-3:03).
Once hard, pop it out of the mold and cut into chunks (3:08-3:12).
Prepare and Dry the Meat (3:18-4:42):
Use a very lean cut of beef, such as round steak (top or bottom round) (3:20-3:27). Trim off any visible fat (3:40-3:42).
Slice the meat against the grain into thin slices (3:32-3:33).
Cut the slices into 3/4 inch strips (3:35-3:36).
Dry the meat using a smoker, dehydrator, or oven (3:50-3:52). The video uses a smoker for a smoky flavor (3:53-3:59).
Smoker Method (Optional): Use pecan and apple wood for smoke (4:01-4:04). Smoke for approximately 10 hours using a cold smoke generator (4:05-4:16).
Cooking Temperature (Smoker/Oven): Cook at 200°F (93°C) for the first hour, then at 165°F (74°C) for the next 12 hours (4:23-4:29).
The meat is done when it is completely dried, crispy, and can be easily broken by hand. It should not be pliable (4:32-4:42).
Make Meat Powder (4:51-5:07):
Place the dried meat into a Vitamix blender (or use a mortar and pestle) (4:54-5:01).
Pulverize the meat until it becomes a fluffy powder (5:04-5:07).
Prepare Optional Fruit Powder (5:25-6:14):
Dehydrate your chosen fruits (blueberries, bananas, cranberries, apricots) (5:28-5:38).
Weigh the dried fruit (5:44-5:46).
Place the dried fruit into a Vitamix blender (5:48-5:51).
Blend until mostly a powder. It's okay to have some small fruit pieces as they provide a favorable texture (5:53-6:11).
Combine Ingredients (6:16-7:28):
In a large bowl, combine the meat powder and the fruit powder (if using) and mix well (6:17-6:25).
Add salt (if using) at 1.5% of the total weight of the meat and fruit powder. Mix thoroughly to ensure even distribution (6:27-6:41).
Weigh out your beef tallow. The goal is to use just enough to bind the mixture without making it too oily (6:50-6:59).
Melt the beef tallow on a double boiler (7:06).
Slowly add the melted tallow to the meat and fruit mixture, mixing continuously until everything is well combined and the powders soak up the liquid tallow (7:07-7:21).
Form and Chill (7:30-7:37):
Form the mixture into a desired mold (e.g., a loaf, or individual bars) (7:30-7:32).
Refrigerate for a couple of hours until hardened (7:33-7:37).
Storage (8:02-8:05):
Once hardened, Pemmican can be stored in a vacuum-sealed bag outside of refrigeration due to its long shelf life (8:02-8:05, 8:40-8:50).
Tips for Success:
Lean Meat is Key: Ensure your meat is as lean as possible, as fat will reduce shelf life and make the Pemmican greasy (3:27-3:42).
Proper Drying: The meat must be completely dry and brittle. Any pliability means it needs more drying time (4:32-4:42).
Tallow vs. Lard: Use beef tallow, not lard. Tallow is firmer, has a higher melting point, and provides the desired texture (1:41-1:47, 10:11-10:18).
Flavor Enhancement: The addition of salt and fruit significantly enhances the flavor and makes the Pemmican more palatable, addressing common complaints about it being bland or tasteless (8:38-8:40, 9:16-9:22). The smoky element from the smoker also adds a nice touch (9:11-9:14).


How To Make 17th Century Clotted Cream - A History
, 3.86M subscribers, Aug 27, 2024 #tastinghistory
Thank you to Trade for sponsoring. Visit https://drinktrade.com/maxmiller to get a free bag of coffee when you sign-up.
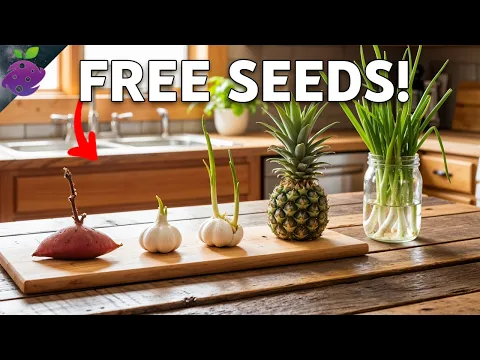
Best Things to Grow for Absolutely Free From Kitchen Scraps!
Jun 13, 2025 #growyourownfood #kitchengardening #gardeningtips
Credit: Special thanks to Mark from Self Sufficient Me for his excellent gardening content on growing food naturally, keeping poultry, and living more self-sufficiently. Check out his channel here: / selfsufficientme Watch his Sweet Potato Tips video: • 5 Tips How to Grow a Ton of Sweet Potato i... Watch his Pineapple Growing video: • Regrow Pineapples from Store Bought Pineap... Your grocery store is hiding a secret garden. From pineapple tops to sprouted garlic and dried beans, this video reveals the 10 easiest crops you can grow for absolutely free using kitchen scraps. No seed packets. No fancy tools. Just your leftovers—and a little knowledge. We explore regrowing food from scraps, including herbs, root vegetables, and pantry items like dried legumes and sprouted onions. These DIY gardening hacks not only save money but can create a self-sustaining food supply right at home. Perfect for beginner gardeners, urban homesteaders, or anyone looking to reduce food waste and grow food naturally. These are powerful kitchen gardening tips you won’t hear at the store—turning what you’d normally throw away into food for months or years to come. Whether you’re living in a small apartment or starting a backyard food forest, this guide gives you the fastest, easiest plants to grow without buying seeds.

Everyone know I can't grow anything but cucumabers, but I am going to try getting a fall garden
g, 1.19M subscribers72,215 views Aug 30, 2025
In this video I answer the question, "What vegetables can I plant in September?" with my top 10 choices for vegetables to sow in September
Medieval Food Preservation Citation
Snell, Melissa. "Medieval Food Preservation." ThoughtCo, Apr. 16, 2025, thoughtco.com/medieval-food-preservation-1788842.
Key Takeaways
Drying was a common method to preserve grains, fruits, and meats by removing moisture.
Salting was used to preserve meat and fish, drawing out moisture to prevent bacteria growth.
Pickling added flavor and preserved vegetables by soaking them in salt brine with herbs and spices.
For centuries before the medieval period, and for centuries afterward, human beings in all parts of the world used a variety of methods to preserve foods for later consumption. Europeans in the Middle Ages were no exception. A society that was largely agrarian would be keenly aware of the need to store up provisions against the ominous threats of famine, drought, and warfare.
The possibility of disaster wasn't the only motive for preserving food. Dried, smoked, pickled, honeyed, and salted foods had their own particular flavors, and many recipes survive detailing how to prepare foods that have been stored with these methods. Preserved foods were also much easier for the sailor, soldier, merchant, or pilgrim to transport. For fruits and vegetables to be enjoyed out of season, they had to be preserved; and in some regions, a particular foodstuff could only be enjoyed in its preserved form, because it didn't grow (or wasn't raised) nearby.
Virtually any kind of food could be preserved. How it was done depended on what type of food it was and whether a particular effect was desired. Here are some of the methods of food preservation used in medieval Europe.
Drying Foods to Preserve Them
Today we understand that moisture allows for the rapid microbiological growth of bacteria, which is present in all fresh foods and which causes them to decay. But it isn't necessary to understand the chemical process involved in order to observe that food that is wet and left in the open will quickly start to smell and attract bugs. So it should come as no surprise that one of the oldest methods of preserving foods known to man is that of drying it.
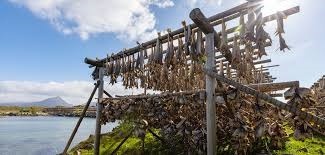
Drying was used to preserve all sorts of foods. Grains like rye and wheat were dried in the sun or air before being stored in a dry place. Fruits were sun-dried in warmer climes and oven-dried in cooler regions. In Scandinavia, where temperatures were known to plunge below freezing in the winter, cod (known as "stockfish") were left out to dry in the cold air, usually after they were gutted and their heads were removed.
Meat could also be preserved through drying, usually after cutting it into thin strips and lightly salting it. In warmer regions, it was a simple matter to dry meat under the hot summer sun, but in cooler climates, air drying could be done at most times of the year, either outdoors or in shelters that kept away the elements and flies.
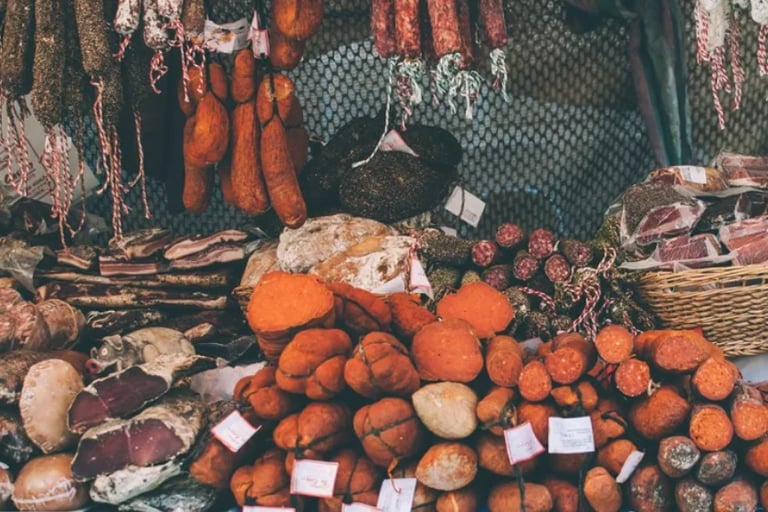
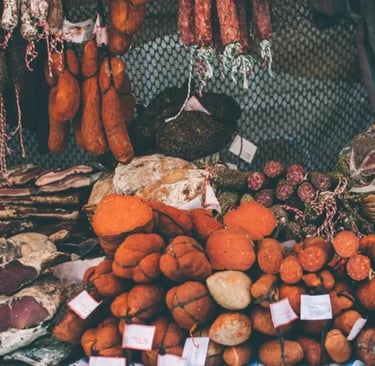
Preserving Foods With Salt
Salting was the most common way to preserve virtually any type of meat or fish, as it drew out the moisture and killed the bacteria. Vegetables might be preserved with dry salt, as well, though pickling was more common. Salt was also used in conjunction with other methods of preservation, such as drying and smoking.
One method of salting meat involved pressing dry salt into pieces of meat, then layering the pieces in a container (like a keg) with dry salt completely surrounding each piece. If meat was preserved this way in cold weather, which slowed down the decomposition while the salt had time to take effect, it could last for years. Vegetables were also preserved by layering them in salt and placing them in a sealable container such as an earthenware crock.
Another way to preserve food with salt was to soak it in a salt brine. While not as effective a long-term method of preservation as packing in dry salt, it served very well to keep food edible through a season or two. Salt brines were also part of the pickling process.
Whatever method of salt preservation was used, the first thing a cook did when he got ready to prepare the salted food for consumption was soaking it in fresh water to remove as much of the salt as possible. Some cooks were more conscientious than others when it came to this step, which could take several trips to the well for fresh water. And it was next to impossible to remove all the salt, no matter how much soaking was done. Many recipes took this saltiness into account, and some were designed specifically to counteract or complement the salt flavor. Still, most of us would find preserved medieval food much saltier than anything we're used to today.
Smoking Meat and Fish
Smoking was another fairly common way to preserve meat, especially fish and pork. Meat would be cut into relatively thin, lean strips, immersed briefly in a salt solution and hung over a fire to absorb the smoke flavoring as it dried — slowly. Occasionally meat might be smoked without a salt solution, especially if the type of wood burned had a distinctive flavoring of its own. However, salt was still very helpful because it discouraged flies, inhibited the growth of bacteria, and hastened the removal of moisture.
Pickling Foods
Immersing fresh vegetables and other foods in a liquid solution of salt brine was a fairly common practice in medieval Europe. In fact, although the term "pickle" didn't come into use in English until the late Middle Ages, the practice of pickling goes back to ancient times. Not only would this method preserve fresh food for months so that it could be eaten out of season, but it could infuse it with strong, piquant flavors.
The simplest pickling was done with water, salt and an herb or two, but a variety of spices and herbs as well as the use of vinegar, verjuice or (after the 12th century) lemon led to a range of pickling flavors. Pickling might require boiling the foods in the salt mixture, but it could also be done by simply leaving the food items in an open pot, tub or vat of salt brine with the desired flavorings for hours and sometimes days. Once the food had been thoroughly infused by the pickling solution, it was placed in a jar, crock, or another airtight container, sometimes with a fresh brine but often in the juice in which it had marinated.
Confits
Although the term confit has come to refer to virtually any food that has been immersed in a substance for preservation (and, today, can sometimes refer to a type of fruit preserve), in the Middle Ages confits were potted meat. Confits were most usually, but not solely, made from fowl or pork (fatty fowl like goose were particularly suitable).
To make a confit, the meat was salted and cooked for a very long time in its own fat, then allowed to cool in its own fat. It was then sealed up -- in its own fat, of course -- and stored in a cool place, where it could last for months.
Confits should not be confused with comfits, which were sugar-coated nuts and seeds eaten at the end of a banquet to freshen the breath and aid the digestion.
Sweet Preserves
Fruits were often dried, but a far more tasty method of preserving them past their season was to seal them up in honey. Occasionally, they might be boiled in a sugar mixture, but sugar was an expensive import, so only the cooks of the wealthiest families were likely to use it. Honey had been used as a preservative for thousands of years, and it wasn't limited to preserving fruit; meats were also stored in honey on occasion.
Fermentation
Most methods of preserving food involved stopping or slowing down the process of decay. Fermentation accelerated it.
The most common product of fermentation was alcohol -- wine was fermented from grapes, mead from honey, beer from grain. Wine and mead could keep for months, but beer had to be drunk fairly quickly. Cider was fermented from apples, and the Anglo-Saxons made a drink called "perry" from fermented pears.
Cheese is also a product of fermentation. Cow's milk could be used, but the milk from sheep and goats was a more common source for cheese in the Middle Ages.
Freezing and Cooling
The weather of the greater part of Europe throughout much of the Middle Ages was rather temperate; in fact, there is often some discussion of the "medieval warm period" overlapping the end of the Early Middle Ages and the beginning of High Medieval Europe (the exact dates depend on who you consult). So freezing was not an obvious method of preserving foods.
However, most areas of Europe did see snowy winters, and freezing was at times a viable option, especially in northern regions. In castles and large homes with cellars, an underground room could be used to keep foods packed in winter ice through the cooler spring months and into the summer. In the long, frigid Scandinavian winters, an underground room wasn't necessary.
Supplying an ice-room with ice was a labor-intensive and sometimes travel-intensive business, so it was not particularly common; but it wasn't completely unknown, either. More common was the use of underground rooms to keep foods cool, the all-important last step of most of the above preservation methods.

In recent years, the prepper movement has shifted from a fringe ideology focused on lone-wolf survival to a more mainstream practice embraced by a diverse cross-section of society. Catalyst events like the COVID-19 pandemic, climate change, and growing economic and political anxieties have driven increased interest, pushing prepping from a niche hobby into a multibillion-dollar industry.
Overview of prepping and survivalism
While the terms are often used interchangeably, there are notable differences in their approach.
Feature PrepperSurvivalistPrimary focusResource accumulation and detailed planning for specific scenarios, such as natural disasters or economic crashes.Skill development and adaptability for long-term self-reliance in a resource-scarce environment, or "thriving in the wild".Typical preparationsStockpiling food, water, medical supplies, and other gear, often stored in a home or "bug-out bag".Cultivating skills like wilderness first aid, blacksmithing, and homesteading. Some adopt a more military-style, combative approach.Community engagementOften focus on local community building and cooperation, rejecting the "bunker mentality" of surviving alone.Historically associated with more isolationist tactics, though modern "retreaters" focus on sustainable, self-sufficient communities.
Historically, the survivalist movement originated during the Cold War with a focus on nuclear threats, evolving through the 1970s and 80s to emphasize economic collapse and living off the grid. The prepper label became distinct in the 2000s, reflecting a more varied, less combative approach to preparedness.
Recent shifts in the prepping community
The past decade has seen a significant transformation in the types of people prepping and their motivations.
Diversified demographics
Wider political spectrum: While once dominated by right-wing individuals concerned with government overreach, the movement has expanded to include politically left-leaning and minority groups. The rise of Donald Trump in 2016, increased climate instability, and racial justice protests in 2020 heightened the sense of insecurity for many, motivating them to prepare.
Younger participants: Younger generations, including millennials and Gen Z, have embraced prepping, often motivated by concerns about climate change and political instability. In a 2024 Forbes survey, 40% of Gen Z identified as preppers, the highest percentage of any age group.
Urban vs. rural: The demographic is no longer primarily rural. A 2025 analysis found that over 90% of preppers live in urban areas, with a majority of those renting apartments.
Mainstreaming of the movement
Mainstream retailers: The rise of prepping has been solidified by major retailers like Costco selling large-scale emergency supplies and food storage kits.
Growth of the industry: The "incident and emergency management" market is projected to reach over $400 billion, with brands selling "bug-out bags" gaining significant traction.
Media representation: Coverage has moved away from focusing on extremist doomsday scenarios and toward presenting preparedness as a sensible choice for ordinary citizens concerned about modern uncertainties.
Focus on community resilience
Networking over isolation: Newer preppers, particularly those on the left, emphasize building social connections and mutual aid networks over solitary survival. This communal approach is seen as a more realistic and effective strategy for weathering crises.
Digital training: The pandemic accelerated a trend toward online training, with virtual courses on subjects like food storage and wilderness medicine growing in popularity.
Realistic preparedness: There's a greater emphasis on preparing for more common, realistic events like power outages, natural disasters, and short-term supply chain disruptions rather than solely focusing on apocalyptic scenarios.
Driving motivations
Loss of institutional trust: Disasters like Hurricane Katrina and slow government responses, coupled with supply chain shocks from the COVID-19 pandemic, have eroded public trust in governmental and corporate reliability during a crisis.
Uncertainty and anxiety: Economic instability, geopolitical tensions, and concerns about climate change have all contributed to widespread anxiety. For many, prepping is a proactive, anxiety-reducing activity that provides a sense of control.

Get the Nuggets
Subscribe Today
(828) 406-6882
barbara.pretzer@pretzeltellsnuggets.com


PretzelTellsNuggets empowers the generation of tomorrow and yesterday for a brighter future and hope for every individual.